

How to install solid hardwood floor - staple down |
Categories
|
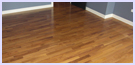
How to staple down solid hardwood floor Staple down is a common used technique for installation of hardwood floor over wood subfloor. The installation process is the same as nail down, which was widely used before. With an invention and getting more and more popularity of pneumatic hardwood stapler staple down method slowly gets over nail down technique. Learn more about types of hardwood floor installation. Before starting on stapling hardwood floor make sure the subfloor is stable and does not make any squeaks or noise otherwise floor will make sound while walking on. The best way to fix this problem is to nail or screw the subfloor to joists. In older houses sometimes it is necessary to replace the subfloor with a new 3/4 inch of plywood. Ones it is fixed unroll craft or tar paper which goes over top of subfloor and start installation of hardwood floor. Read installation tips. Staple strips or planks every 12 inches and 2 - 3 inches from both ends. If it is a short piece put at least 2 staples from both sides. Leave 1/4 of an inch space in between the floor and walls. It will be covered with a baseboard and shoe base molding. If you run in to the situation when it is necessary to change a direction - use a slip tongue in between two grooves. It is easy to make by yourself on table saw from any plank of the hardwood or buy it from the store which sells hardwood flooring. Always use glue while putting a slip tongue. Wood floor vents also have to be glued and nailed to the subfloor. Last rows, which are close to the walls or other obstacles, and staple gun cannot reach nail to the subfloor from the top with a finish nail gun, and apply glue as well. |
|