


How to install prefinished solid hardwood flooring – nail down |
Categories
|

Before you buy Check with manufacturer whether the wood you are planning to get suitable for particular area. Solid hardwood floors cannot be installed below the grade as well as some hardwood floors might not be recommended for installation in the areas with high moisture level such as bathrooms. Read manufacturer warranties for certain product and make sure to understand what will be covered and possible reasons for voiding. All the time buy minimum 10% more wood than actual square footage of certain installation area allowing some extras for waste or even possible repair in the future. Acclimatization All newly bought hardwood flooring has to be acclimated to the temperature and humidity of the room where it will be installed. Acclimatization period might vary from 48 hours to a few days and will depend on a type of wood. Subfloor preparation Prior to nailing down solid hardwood flooring subfloor has to be checked and in case of discovering any noise, squeaks and damages has to be fixed. Moisture content of subfloor must be in a normal range which typically 7 – 10 percent. Door jambs have to be trimmed allowing hardwood planks go underneath. All baseboards and shoe base trims have to be removed from the perimeter of a room. Subfloor has to be absolutely clean and felt paper has to be installed prior to laying solid hardwood flooring. Never use plastic as an underlayment option while installing hardwood flooring over wood subfloor, because it will trap the moisture and might cause developing such problems as bucking, cupping, crowning or warping. Start installation For the best visual effect it is always better to start installation from the entrance to the room with selected planks. First row has to be installed in a straight line regardless how imperfect wall might be. Planks have to be nailed or screwed from the top and holes have to be filled with wood filler. Hardwood flooring is a natural material and has an ability to shrink and expand as a reaction on changing the room temperature and humidity. For this matter about 3/4 – 5/8 of an inch (19 - 16 mm) expansion space should be left in between the wood flooring and wall which will be covered by 5/8” thick baseboard plus 1/4 – 3/4 shoe base molding. Using very thin baseboards what is very typical for contemporary house design might require cutting the drywall about one inch high and leaving expansion space in between the wall bottom plate (frame) and hardwood flooring. Nail down hardwood flooring Using proper nail gun or hardwood flooring stapler is essentially important to complete the project successfully. While installing 3/4” solid hardwood flooring 2 inches long nails or staples should be used. Shorter 1 3/4 or 1 1/2 nails might be used for thinner wood flooring. Each plank or strip has to be nailed every 8” – 10” and 2 – 3 inches from both side ends. Finishing up Similar to the first row last rows have to be nailed from the top because operating wood flooring stapler will be restricted by the wall. Baseboards and shoe base installation is the last step in completing the project. Tips This technique will work while installing hardwood flooring strips up to 3 1/4” in width. Wider planks besides nailing might require adhesive application on every single board or on the subfloor. Wood flooring nosings, if any require, have to be installed prior to actual hardwood floor installation. 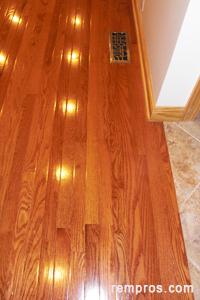
Tools require: - Wood flooring moisture meter Materials require: - Hardwood flooring |
|